English
 日本語
日本語
A nail drive anchor is a single-piece fastening device that combines a concrete nail and an anchor sleeve, allowing it to be driven directly into concrete, masonry, or block with a hammer — no pre-drilling required in many applications. For tradespeople and DIYers who need a fast, reliable, low-profile anchor in hard base materials, the nail drive anchor delivers installation times up to 70% faster than traditional expansion anchors that require a separate drill bit and screw.
This guide covers exactly how nail drive anchors work, the types available, how they compare to alternative fastening methods, load capacity data, installation best practices, and answers to the most common questions.
Content
- How Does a Nail Drive Anchor Work?
- Types of Nail Drive Anchors: Which Design Fits Your Application?
- Nail Drive Anchor Types Compared: Loads, Materials, and Best Uses
- Nail Drive Anchor vs. Other Concrete Fasteners: How Do They Compare?
- Nail Drive Anchor Load Capacity: What the Numbers Mean
- How to Install a Nail Drive Anchor: Step-by-Step Guide
- Common Applications for Nail Drive Anchors in Construction and DIY
- How to Choose the Right Nail Drive Anchor Size
- Top Nail Drive Anchor Mistakes and How to Avoid Them
- Frequently Asked Questions About Nail Drive Anchors
- Conclusion: When Is a Nail Drive Anchor the Right Choice?
How Does a Nail Drive Anchor Work?
A nail drive anchor works through mechanical expansion: a hardened steel pin (the nail) is driven into a pre-installed or co-installed anchor body (sleeve), forcing the sleeve's lower section to expand outward against the walls of the hole or the base material, creating a friction and bearing lock that resists pull-out. The process is straightforward:
- Position the anchor — Place the anchor assembly (nail pre-inserted loosely in the sleeve) against the material at the desired location.
- Drive the nail — Strike the nail head with a hammer (or powder-actuated tool for high-volume applications) until the nail is fully seated and flush.
- Expansion locks the anchor — As the nail travels down the sleeve bore, a tapered section at the nail's tip forces the lower legs of the sleeve to spread outward, gripping the surrounding material.
- Install the fixture — The nail head (or a washer/flange integral to some designs) clamps the fixture to the surface.
In pre-drilled applications, the sleeve is first inserted into a correctly sized pilot hole, then the nail is driven in. In direct-drive designs suited to softer masonry, the entire assembly penetrates the material without pre-drilling.
Types of Nail Drive Anchors: Which Design Fits Your Application?
Nail drive anchors are not one-size-fits-all. Several distinct designs exist, each optimized for different base materials, load directions, and installation methods.
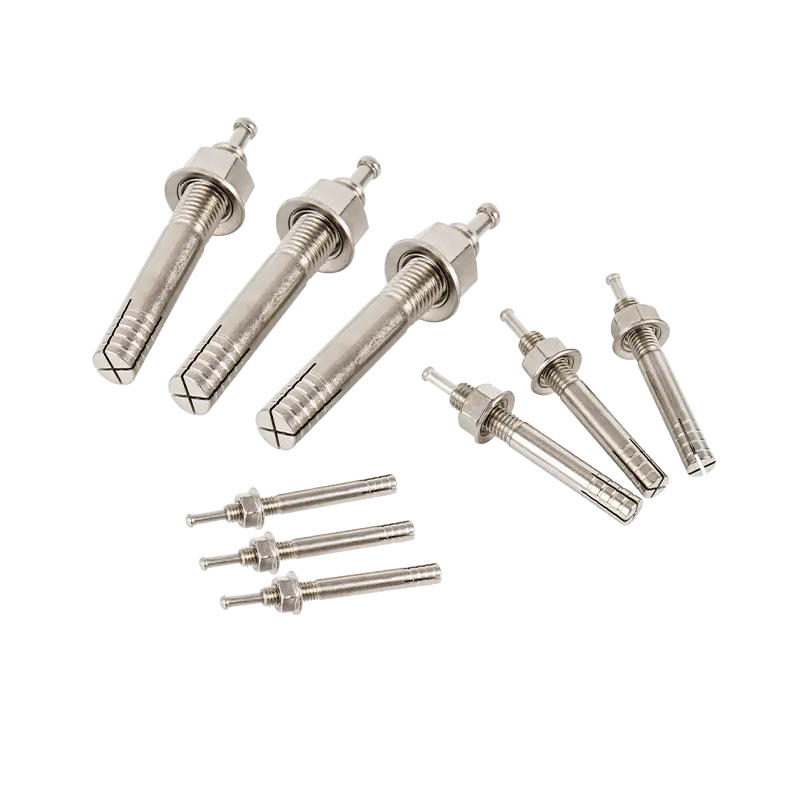
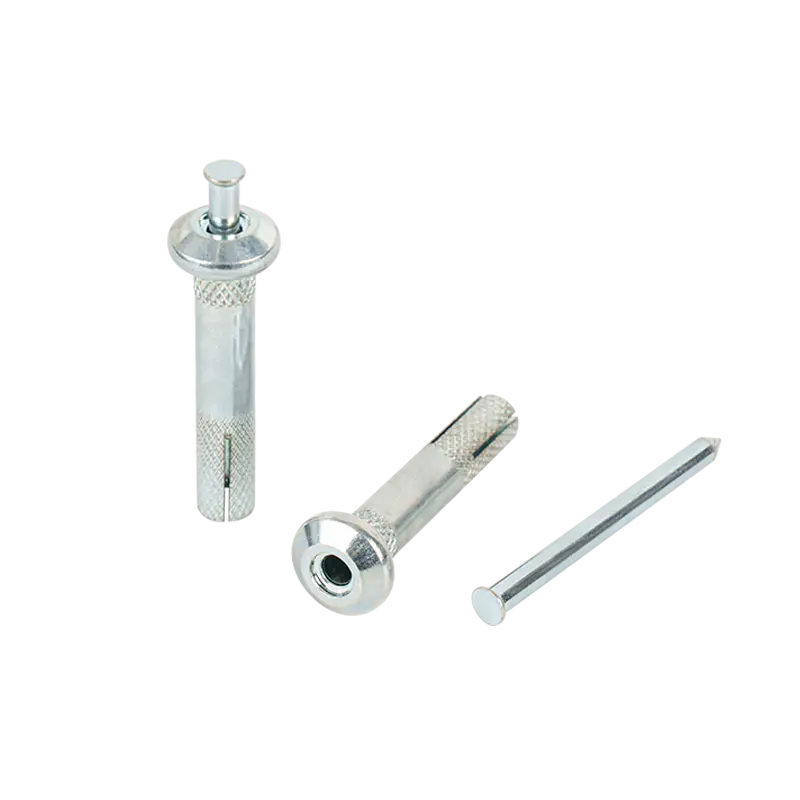
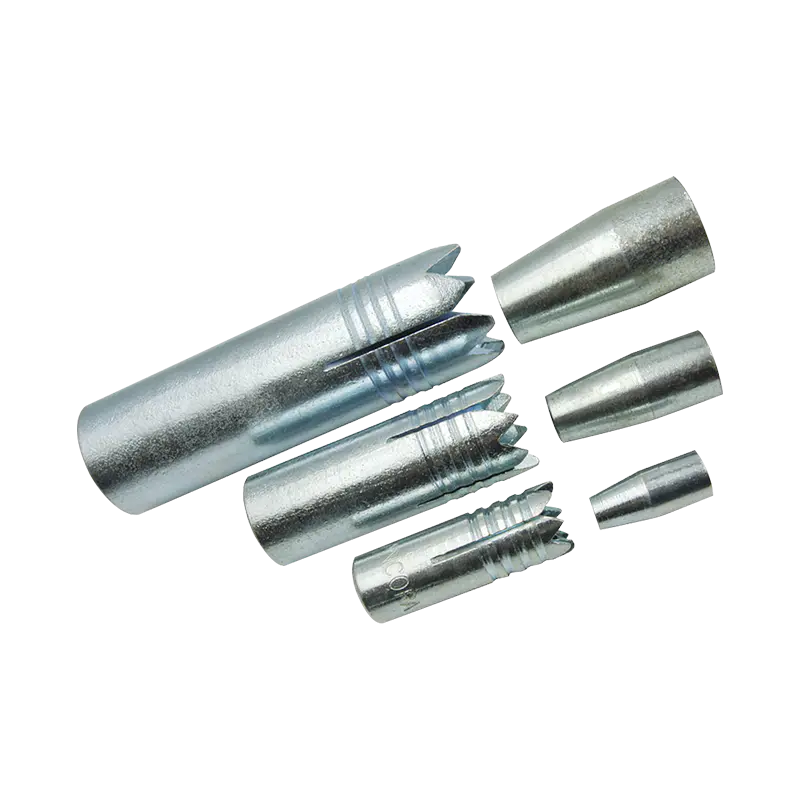
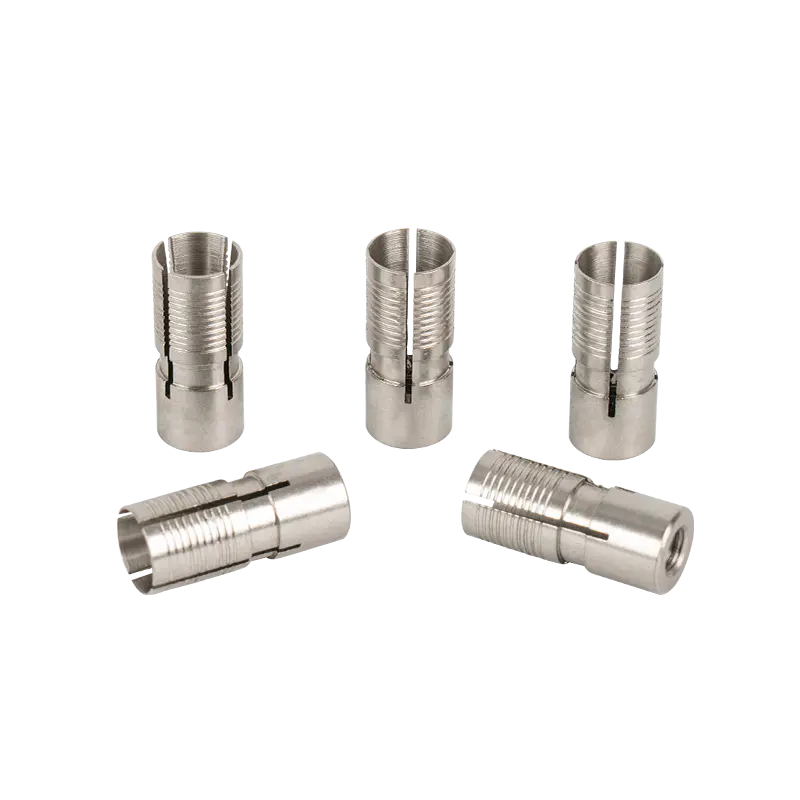
1. Hammer Drive Anchor (Pin Anchor)
The hammer drive anchor is the most common form of nail drive anchor for general construction use. It consists of a zinc alloy or nylon sleeve and a hardened carbon steel pin. The sleeve is inserted into a pre-drilled hole (matching the sleeve's outer diameter), the fixture is placed over the sleeve flange, and the pin is driven flush with a hammer. Standard sizes range from 1/4" × 1" to 3/8" × 3", with working shear loads of 200–900 lbs depending on size and base material. It is ideal for attaching furring strips, conduit clips, electrical boxes, and threshold plates to concrete floors or block walls.
2. Zinc Drive Anchor (Flat Head Pin Anchor)
The zinc drive anchor uses a zinc alloy sleeve for moderate corrosion resistance and a flat, low-profile head that sits flush with the fixture surface once driven. It is commonly used in light-load interior applications — attaching metal tracks, pipe clamps, wire management clips, and signage to concrete or block. Zinc drive anchors are not recommended for outdoor or high-humidity environments; stainless steel or nylon versions should be substituted in those conditions.
3. Nylon Nail Drive Anchor
A nylon nail drive anchor replaces the metal sleeve with a nylon body, giving it complete corrosion immunity, electrical insulation, and compatibility with materials that galvanic contact with metal could damage. Common applications include tile and stone anchoring, electrical insulation requirements, and outdoor environments where metal corrosion is a concern. The trade-off is lower shear and tensile strength compared to metal sleeve designs — typically 100–400 lbs working load vs. 200–900 lbs for zinc or steel versions.
4. Powder-Actuated Drive Anchor (PAF Nail)
In high-volume commercial construction, a powder-actuated fastener (PAF) — also called a powder-actuated nail anchor — uses a controlled explosive charge to drive a hardened nail directly into concrete or steel in a fraction of a second. These are the fastest nail drive anchors available, used extensively for attaching steel track to concrete slabs, wood bottom plates to concrete, and suspended ceiling grid to concrete decks. Penetration depths of 1/2" to 1-1/4" into concrete are typical, with shear values of 500–1,500 lbs per fastener in 3,000 PSI concrete.
5. Concrete Cut Nail (Masonry Nail)
The simplest form of a nail drive anchor, the hardened masonry cut nail is driven directly into mortar joints or softer block material without a sleeve. It is the lowest-cost option (as little as $0.03 per fastener in bulk) and fastest to install but also the least consistent in holding values and is not suitable for structural loads. Best used for attaching furring strips to mortar joints, temporary formwork, or light trim to block.
Nail Drive Anchor Types Compared: Loads, Materials, and Best Uses
| Type | Sleeve Material | Typical Working Load | Pre-Drill Required? | Best Application | Cost per Unit |
| Hammer Drive Anchor | Zinc alloy / Steel | 200–900 lbs | Yes | Conduit clips, strut, furring | $0.15–$0.60 |
| Zinc Drive Anchor | Zinc alloy | 150–600 lbs | Yes | Light indoor fixtures | $0.10–$0.45 |
| Nylon Nail Drive | Nylon | 100–400 lbs | Yes | Corrosive environments, tile | $0.12–$0.50 |
| PAF Nail Anchor | Hardened steel | 500–1,500 lbs | No | Steel track, bottom plates | $0.20–$0.80 |
| Masonry Cut Nail | Hardened steel | 50–200 lbs | No | Furring, mortar joints | $0.03–$0.15 |
Table 1: Comparison of nail drive anchor types by material, load capacity, installation method, and cost.
Nail Drive Anchor vs. Other Concrete Fasteners: How Do They Compare?
The nail drive anchor excels in speed and simplicity, but it is not always the best choice. Understanding how it stacks up against screw anchors, wedge anchors, and adhesive anchors helps ensure you select the right fastener for the job.
| Fastener Type | Installation Speed | Max Tensile Load | Removable? | Best Base Material | Vibration Resistance |
| Nail Drive Anchor | Very Fast (5–15 sec) | 200–900 lbs | No (permanent) | Solid concrete / block | Good |
| Screw Anchor (Tapcon-style) | Moderate (2–4 min) | 200–1,200 lbs | Yes (re-usable) | Concrete, brick, block | Very Good |
| Wedge Anchor | Moderate (3–5 min) | 1,500–8,000+ lbs | No (permanent) | Solid concrete only | Excellent |
| Sleeve Anchor | Moderate (3–5 min) | 500–3,500 lbs | No | Concrete, block, brick | Good |
| Adhesive Anchor | Slow (cure time req'd) | 2,000–20,000+ lbs | No | Concrete, cracked zones | Excellent |
Table 2: Nail drive anchors vs. alternative concrete fasteners — speed, load, removability, and best use cases.
Key takeaway: Choose a nail drive anchor when installation speed matters most, the load is light-to-moderate (under 900 lbs), and permanence is acceptable. For heavy structural loads, seismic zones, or applications requiring future removal, wedge anchors, screw anchors, or adhesive anchors are more appropriate.
Nail Drive Anchor Load Capacity: What the Numbers Mean
Load capacity data for nail drive anchors is typically published as ultimate load (failure load in testing) divided by a safety factor of 4:1 to arrive at the allowable working load. Always design to the allowable (working) load, not the ultimate load. Key variables that affect performance:
- Concrete compressive strength (PSI) — Higher PSI concrete (e.g., 4,000 PSI) yields significantly higher anchor values than 2,500 PSI concrete. A 1/4" × 1" hammer drive anchor may achieve 300 lbs shear in 3,000 PSI concrete but only 185 lbs in 2,000 PSI concrete.
- Anchor diameter and embedment depth — Larger diameter (3/8" vs. 1/4") and greater embedment both increase pull-out resistance substantially. A 3/8" × 3" anchor may carry 3× the load of a 1/4" × 1" unit in the same base material.
- Edge and spacing distance — Installing a nail drive anchor too close to a concrete edge reduces capacity significantly. Minimum edge distance is typically 10× the anchor diameter (e.g., 2-1/2" for a 1/4" anchor). Minimum spacing between anchors is typically 10× diameter as well.
- Load direction — Shear loads (parallel to surface) are generally higher than tensile loads (perpendicular, pull-out) for nail drive anchors.
- Base material condition — Cracked concrete, hollow block, or deteriorated masonry all reduce holding values. Nail drive anchors are not rated for use in cracked concrete under dynamic or seismic load conditions.
How to Install a Nail Drive Anchor: Step-by-Step Guide
Correct installation of a nail drive anchor is simple but requires attention to hole sizing, depth, and perpendicular driving — mistakes at any step reduce holding strength by 30–60%.
Tools and Materials Needed
- Hammer drill with correctly sized carbide-tipped masonry bit (diameter matches anchor sleeve O.D.)
- Hammer (16–22 oz ball peen or claw hammer)
- Depth gauge or tape measure
- Compressed air or blow-out bulb (to clean hole)
- Nail drive anchors in the required size and material
- Safety glasses
Installation Steps
- Mark the location — Use a pencil or marker to indicate exactly where the anchor will be placed, ensuring edge distance requirements are met (minimum 10× anchor diameter from any concrete edge).
- Drill the pilot hole — Using a hammer drill with the correct carbide masonry bit, drill perpendicular to the surface to the required depth (anchor length + 1/2" minimum for debris clearance). Drilling at an angle weakens the anchor installation.
- Clean the hole — Blow out concrete dust from the hole with compressed air or a blow-out bulb. Debris left in the hole prevents full sleeve expansion and reduces holding strength by up to 40%.
- Position the fixture (if applicable) — If the anchor passes through a fixture hole, align the fixture before inserting the anchor.
- Insert the anchor — Push the nail drive anchor assembly (sleeve with pin loosely pre-inserted) into the hole until the flange is flush against the fixture or surface.
- Drive the pin — Strike the nail head squarely and repeatedly with the hammer until the nail head is fully seated flush with the top of the sleeve. Typically requires 5–15 firm hammer blows. Do not over-strike once flush — this can damage the expansion mechanism.
- Inspect the installation — Visually confirm the pin is fully seated, the sleeve flange is tight to the surface, and there is no gap between the fixture and base material.
Pro tip: If the pin bottoms out before the flange seats firmly, the hole is too deep. If the pin cannot be driven flush without excessive force, the hole may be undersized — never force a mismatched anchor, as you risk splitting the sleeve and losing all holding strength.
Common Applications for Nail Drive Anchors in Construction and DIY
Nail drive anchors are one of the most versatile light-duty fasteners in concrete and masonry construction, used across a wide range of commercial, industrial, and residential applications.
Commercial and Industrial Uses
- Attaching electrical conduit clips and EMT straps to concrete walls and ceilings
- Securing metal strut (unistrut) channels to concrete decks
- Fastening suspended ceiling grid hangers to concrete slab soffits
- Installing pipe support clamps and cable tray brackets
- Anchoring metal stud track bottom plates to concrete floors (with PAF nail anchors)
- Mounting access panel frames and door threshold plates
Residential and DIY Uses
- Attaching furring strips to concrete basement walls for paneling or insulation framing
- Securing wall-mounted shelving brackets to concrete or block foundation walls
- Fastening window trim, door casing, and baseboard to concrete or masonry
- Installing outdoor fence post base hardware into concrete patios
- Anchoring light fixtures, motion sensors, and security cameras to masonry exteriors
- Attaching garden edging and landscape border clips to concrete walkways
How to Choose the Right Nail Drive Anchor Size
Selecting the correct nail drive anchor size requires balancing the required load, the fixture hole diameter, the base material, and the available embedment depth. Use the following sizing logic:
| Anchor Size | Drill Bit Size | Min Embedment | Shear (3,000 PSI) | Tensile (3,000 PSI) | Typical Use |
| 3/16" × 7/8" | 3/16" | 1/2" | ~185 lbs | ~120 lbs | Cable clips, thin trim |
| 1/4" × 1" | 1/4" | 5/8" | ~300 lbs | ~195 lbs | Conduit clips, straps |
| 1/4" × 1-1/4" | 1/4" | 7/8" | ~380 lbs | ~240 lbs | Furring, light brackets |
| 3/8" × 2" | 3/8" | 1-3/8" | ~720 lbs | ~465 lbs | Strut channel, pipe hangers |
| 3/8" × 3" | 3/8" | 2-3/8" | ~900 lbs | ~595 lbs | Heavy pipe supports, shelving |
Table 3: Nail drive anchor size guide with drill bit requirements, embedment depth, and allowable load values in 3,000 PSI concrete.
Top Nail Drive Anchor Mistakes and How to Avoid Them
Most nail drive anchor failures in the field trace back to a small set of avoidable installation errors. Being aware of them before you start can prevent costly rework.
- Wrong hole diameter — The most common error. Using a bit that is even 1/32" too large results in the sleeve spinning in the hole instead of expanding, yielding near-zero holding strength. Always verify bit size matches anchor sleeve O.D. exactly.
- Insufficient hole depth — If the hole is too shallow, the pin cannot travel far enough to fully expand the sleeve. Always drill at least 1/2" deeper than the anchor's minimum embedment.
- Dirty hole — Concrete dust and debris in the hole acts as a lubricant, reducing friction between the expanded sleeve and the hole wall by up to 40%. Always blow out the hole before inserting the anchor.
- Installing in hollow block cells — A nail drive anchor driven into the hollow cavity of a CMU block has nothing to expand against and will fail immediately. Always anchor into the solid web or face shell of block, or use a toggle or hollow-wall anchor instead.
- Driving at an angle — An angled hole and angled installation create asymmetric expansion, reducing holding strength and creating eccentric loading on the fixture.
- Installing too close to an edge or another anchor — Violating minimum edge and spacing distances causes concrete cone failure at loads well below rated capacity. Maintain ≥ 10× diameter from edges and between anchors.
Frequently Asked Questions About Nail Drive Anchors
Q: Can a nail drive anchor be removed once installed?
Generally, no — a nail drive anchor is considered a permanent fastener. Once the pin is driven and the sleeve expands, the anchor cannot be extracted without destroying the sleeve. The most practical removal method is to drive the pin fully through the sleeve into the concrete (where hole depth allows), then patch the surface. For applications where future removal is needed, use a screw-type concrete anchor instead.
Q: Can nail drive anchors be used in brick or natural stone?
Nail drive anchors can be used in solid brick and some natural stone with caution. Drill into the brick body (not the mortar joint) using a hammer drill, being careful not to fracture the brick. In soft or poorly fired brick, drill without the hammer setting and use a nylon sleeve for lower expansion forces. Natural stone varies widely — hard granite accepts nail drive anchors well, while soft sandstone or limestone may crack. Always test on a sample piece first and reduce applied loads by at least 50% for any stone other than concrete.
Q: What is the difference between a nail drive anchor and a toggle bolt?
A nail drive anchor is designed exclusively for solid base materials (concrete, masonry, solid brick) where the anchor can expand against the hole walls. A toggle bolt is designed for hollow materials (drywall, hollow block, hollow metal doors) where a spring-loaded or gravity-activated wing expands behind the hollow cavity. Using a nail drive anchor in hollow material will result in immediate failure; using a toggle bolt in solid concrete is unnecessary and impractical.
Q: Are nail drive anchors rated for outdoor and wet environments?
It depends on the sleeve material. Standard zinc alloy nail drive anchors are suitable for occasional moisture but will corrode in continuously wet or marine environments over 2–5 years. For outdoor exposed applications, use nylon nail drive anchors or specify anchors with stainless steel components. For fully submerged or chemically aggressive environments, adhesive anchors with stainless threaded rod are the preferred solution.
Q: How many nail drive anchors do I need to support a shelf on a concrete wall?
For a wall-mounted shelf bracket into concrete using 1/4" × 1" hammer drive anchors (allowable tensile ~195 lbs each in 3,000 PSI concrete), apply a safety factor of 4:1 to your total shelf load including shelf weight, contents, and dynamic loading (people leaning on it). A shelf expected to carry 150 lbs total should be anchored with a minimum of 4 anchors providing 780 lbs allowable tensile capacity — more than 5× the applied load. For heavy-duty shelving over 250 lbs, upgrade to 3/8" anchors or use wedge anchors.
Q: Can nail drive anchors be used in ceilings (overhead applications)?
Yes, but with important caveats. Overhead nail drive anchor installations are subject to tensile (pull-out) load rather than shear, and tensile capacity is lower — typically 35–45% of the shear value. Additionally, overhead anchors require a higher safety factor (commonly 5:1 or greater in occupied spaces) due to the fall hazard. For suspended ceiling grid in commercial construction, lightweight PAF nail anchors are code-accepted with specific spacing requirements, but for heavier suspended loads (over 25 lbs per anchor point), consult a structural engineer and use certified adhesive or mechanical anchors.
Conclusion: When Is a Nail Drive Anchor the Right Choice?
A nail drive anchor is the right choice when you need a fast, permanent, light-to-moderate-duty fastening solution in solid concrete or masonry and installation speed is a priority. For conduit runs, furring, pipe clips, ceiling grid, threshold plates, and hundreds of similar construction tasks, no fastener matches the combination of simplicity, speed (5–15 seconds per anchor), low cost ($0.10–$0.60 per unit), and adequate load capacity.
Where nail drive anchors fall short — heavy structural loads over 1,000 lbs, seismic or dynamic loading, cracked concrete, hollow block cells, or any application requiring future removal — alternative anchor systems are the correct call.
The keys to reliable performance are straightforward: match anchor size and sleeve material to the application, drill the hole to the exact diameter with adequate depth, clean the hole before inserting the anchor, drive the pin squarely to full engagement, and respect minimum edge and spacing distances. Do these five things consistently, and a nail drive anchor will perform to its full rated capacity every time.